Mr. Hill (2013 - 2014)
Course Description
Students dig deep into the engineering design process, applying math, science, and engineering standards to hands-on projects. They work both individually and in teams to design solutions to a variety of problems using 3D modeling software, and use an engineering notebook to document their work.
Parametric Equations & Derived Parts Project (Chess Set)
Design a themed chess set with the standard pieces in three sizes: normal for home, small for travel and large for outside. Use parametric functions constraints. Every piece will rest on a derived base part.
Constraints
There must be three different sizes for the chess set. The base must be derived from one drawing and used for all the pieces. Pieces must use a least two different features. The complete chess set must contain: two Kings, two Queens, four Bishops, four Knights, four Rooks, 16 Pawns, and one Chess Board. Each piece must be contained in a 1.5 by 1.5 square inch base. Each type of piece had a unique height constraint. The board was 12 by 12 square inches.
Our DesignThe theme for our Chess Set was World War II. We modeled many unique pieces such as: an infantryman, a tank, a submarine, and a general. We used Autodesk Inventor to turn sketches into parametrically defined models. One dimension in the model would be used as a base for every dimension in the entire part. If that dimension is doubled, the entire scale of the part is doubled. We came across an issue with location dimensions. If we didn't properly constrain parts or dimension distances, the part would clip through itself.
|
|
Reverse Engineering Project (10-Color pen)
This project will demonstrate sketching techniques, use of precision measuring equipment, work in a group setting, mastery in Autodesk Inventor, and advanced skill in dimensioning orthographic drawings. This project also gave an understanding into industry practices such as the concept of reverse engineering a product and conducting analyses in order to better understand a design.
Procedure
I was required to create a Visual, Functional, and Structural Analysis for the product before moving forward. Next, I created detailed annotated sketches so I could model the object and its constituent parts in Autodesk Inventor. Each part was then assembled in an Inventor assembly which would show how the pieces would interact with one another. Then, one constraint of the assembly would be driven, essentially allowing one degree of freedom to simulate motion. The entire process would then be presented to the class.
My DesignI selected the Geddes 10-Color pen. Each color had a spring and tab. The user would slide the tab down and the cap of the pen would guide the pen out of the top hole. Instead of using ten differently colored pens, a customer would only need one 10-color pen.
I completed a full analysis of the visual, functional, and structural aspects of the design. The visual analysis considered the aesthetics and ergonomics of the design. The functional analysis observed what operations had what effect on the product. The structural analysis looked at how the product was organized. |
|
|
After an analysis of the product, I took it apart to gain a full understanding of how the product functioned. Most parts of the pen, like the cap and the individual pens could be easily removed. The bottom button and the springs and tabs were more securely in the pen. A press pushed the button out of the bottom shell without rendering the pieces unusable.
|
|
|
After creating detailed sketches of the pieces, Autodesk Inventor was used to model the pieces. Using complex modeling techniques, the pen was recreated in Autodesk Inventor. These techniques were rather difficult to show in the drawing, but they were shown in the end.
The pieces were then brought together in an Inventor assembly, which showed an exploded view of the product, how the pieces sat in relation to one another. |
|
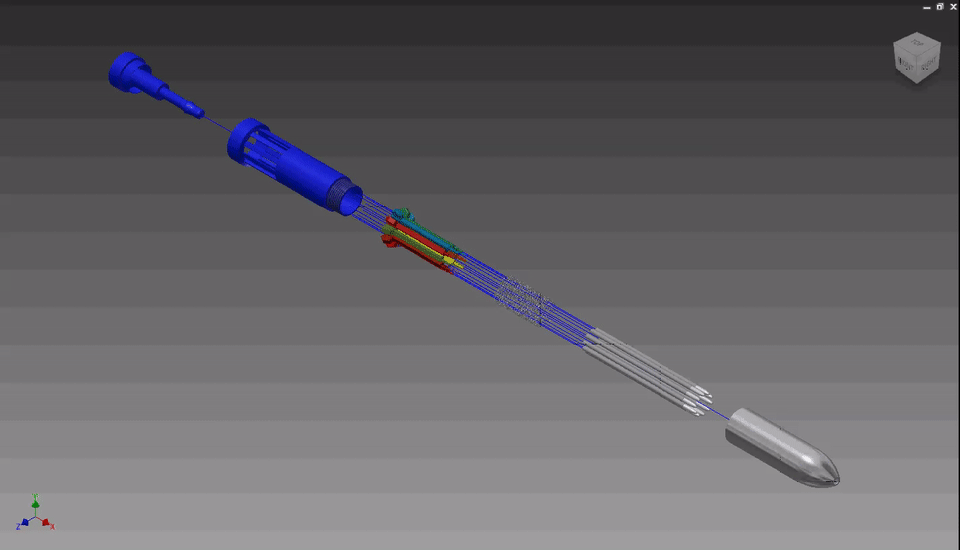
Unfortunately, Inventor does not use collision in its animations, so the pens wouldn't properly slide along the cap as they should when animated.
